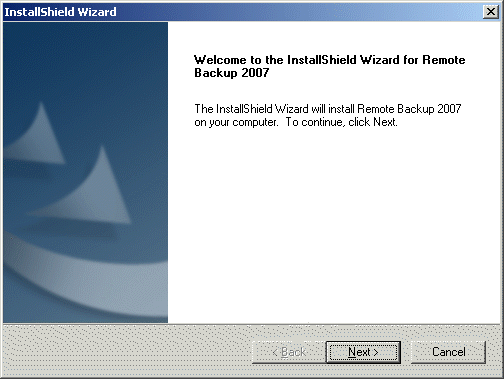
The Client installation experience can be customized to a great extent by modifying four files that are included in all Client installation sets: clsetup.ini,rbackup.reg,default.lngandsetup.ini. Use ONLY Windows Notepad to edit these files.
Editing these files will allow you to:
Change the name of the default installation directory
Change the installation screen captions and text
Change the defaults for the user prompts
Disable the Desktop shortcut
Disable the Progress screens
Disable the Welcome screen
Change the text of the user prompts
Change the Add/Remove Programs Info, including the program name
Change the name of the Service (if installing as a Service)
Change the Company Name from Remote Backup Systems to your own
Change the titles of the Shortcuts
Change the title of the Program Folder
Change the URL in Add/Remote Programs to your own
Change the text of (or remove) the Check for Updates Shortcut
Disable the insertion of a Shortcut in the Startup Group
Change the program and parameters of the Shortcuts
Disable running the Client software at the end of the installation
Force a reboot (even if not required) at the end of the installation
Change user prompt levels for some features
Important Notes:
Do not change text inside square brackets [].
Do not change text to the LEFT of the "equal" sign =.
ALL text to the right of the "equal" sign is enclosed in double quotes.
Change ONLY the text inside the double quotes.
Edit this file ONLY with Windows Notepad.
This is a copy of the default clsetup.ini file that is shipped with the software. (some packages may have different features) After you have made changes, save clsetup.ini into the root directory of your Client setup file set.
[root]
product_name="Remote Backup"
company_name="Remote Backup Systems, Inc."
screen_captions="Remote Backup Systems Installation Wizard"
target_dir="Remote Backup"
folder_name="Remote Backup"
help_title="Documentation"
help_link=""
publisher = "Remote Backup Systems"
owner = "Remote Backup Systems, Inc."
url = "http://remote-backup.com"
check_updates_shortcut = "Check for Updates"
user_license_file = "userlicense.txt"
[features]
disable_startup_shortcut = "NO"
disable_desktop_shortcut = "NO"
disable_welcome_screen = "NO"
disable_destination_screen = "NO"
shortcut_command = "rbackup.exe"
shortcut_parameter = "open"
disable_rbackup_exe = "NO"
force_reboot = "NO"
reboot_text = ""
test_installer = "NO"
[welcome]
title_caption="Remote Backup"
setup_message="Welcome to Remote Backup setup. This wizard will guide you through installing this software."
[license]
title_caption="Remote Backup"
question_1="I accept the terms of the license agreement."
question_2="I do not accept the terms of the license agreement."
[userlicense]
title_caption="Remote Backup"
question_1="I accept the terms of the license agreement."
question_2="I do not accept the terms of the license agreement."
[destination]
title_caption="Remote Backup"
setup_message="Select the destination folder for this software."
[finished]
title_caption="Remote Backup"
setup_message="This computer must be restarted to complete this operation. Would you like to reboot now?"
The name of your company. For example, Jumbo Backup Service. This appears on some installation screens and in the Add/Remove programs right-click info.
The text you want to appear in the caption of the installation screens. This text appears first on the screens, in the upper left.
The installation directory. The default is \Program Files\Remote Backup\. You can change it using this feature to (as an example) \Program Files\Jumbo Backup\ by replacing this value with "Jumbo Backup" Important Note: Do not include any characters that are illegal for Windows filenames, such as most punctuation marks.
The name of the Program Folder which appears in the Start Menu.
The label of the Shortcut to the user documentation. If you don't want the installer to create a shortcut for the documentation, enter a blank value by using two double quotes, for example: help_title = ""
The name of the help file, or a link to a web-based help file. This is the resource that will be called in the Help menu and in the Documentation shortcut. The link must include a registered file type such as .CHM or .HTM, or anything that Windows knows what to do with. The link must include the full path to the file. If leave this blank, the default help file is used - rbackup.chm.
To use web-based help, you can include the word "explorer" and a complete URL for the file you want to run. For example: "explorer http://yourdomain.com/help/clienthelp.htm"
The "Publisher" information as displayed in the Add/Remove Programs right-click information menu.
The "Owner" information as displayed in the Add/Remove Programs right-click information menu.
The URL displayed in the Add/Remove Programs right-click information menu.
The label of the Shortcut to be clicked to check for software updates. This shortcut uses the RBSUpdate Utility, which is installed with all installations. You may not want your customer to be able to check for updates, or you haven't set up your software to distribute updates. In that case, enter a blank value by using two double quotes, for example: check_updates_shortcut = "" For more information see the chapter on the RBSUpdate Utility.
The file name of the user license file. Do not enter a drive or path. This value should be a file name only. The file type can be a raw text file with the extension .TXT or a Rich Text Format file with the extension .RTF.
Enter YES to disable the installer creating a shortcut on the Desktop. Otherwise, enter NO. Valid answers are YES and NO and must be all upper case.

Enter YES to disable the installer displaying the Welcome Screen:
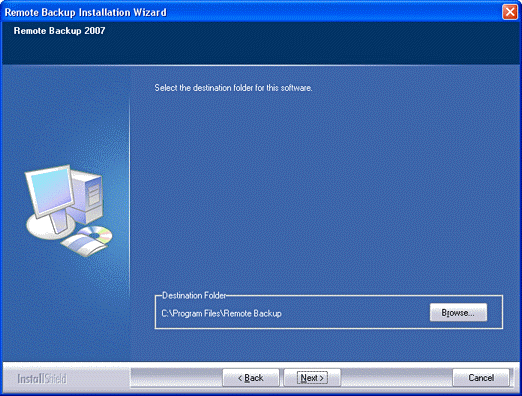
Enter YES to disable the installer displaying the Destination Screen:
Enter YES to disable the installer creating a shortcut in the Startup Group when the Client software is installed as an Application. This will prevent the Client software from running whenever Windows is started. Otherwise, enter NO. This option is ignored if the software is installed as a Service. Valid answers are YES and NO and must be all upper case.
This is the program that is executed by any of the Shortcuts that start the Client software - the Desktop shortcut, the Start Menu shortcut, or the Startup Group shortcut. The default is "rbackup.exe" which is the System Tray application that includes the RBackup scheduler and its right-click menu. Some RBS Providers prefer to use the Windows Task Scheduler instead of RBackup's built-in scheduler, and run "rbclient.exe" instead of "rbackup.exe". In this case, there would be no right-click menu in the System Tray. Important Note: If you change this value to "rbclient.exe" you should also set disable_startup_shortcutto YES, otherwise the Client's main program interface will open with Windows.
This parameter is passed to the program executed by shortcut_command. Both rbackup.exe and rbclient.exe can be started with various parameters, which should be used only on the advice of an RBS Technician to address specific issues. Leave this value at its default unless otherwise advised.
Answer YES to disable running the Client application at the end of the installation. The default is NO. Valid values are YES and NO, and must be all upper case.
Answer YES to force the installer to perform a reboot at the end of the installation, even if a reboot is not required. The installer will only require a reboot if some of the components it has installed were in use by other applications at the time of the installation. A reboot is not required in most installations. The default is NO. Valid values are YES and NO, and must be all upper case.
 reboot_text
This value is normally empty, which displays a normal reboot screen, asking the user if he wants to reboot (if required by the installation, or specified in force_reboot). If reboot_text is empty, and the installation needs to reboot, the text in [finished] : setup_messageis displayed in this screen.
Entering text in reboot_text does two things:
It changes the reboot screen to give the user no choice to have the computer reboot;
It prints the text defined in reboot_text in a reboot screen that gives the user only one choice - OK - after which the computer reboots.

This option is used to test and debug your customized installer.Thisoption is set to NO during normal operation. You can set it to YES temporarily to test your installer customization. When set to YES, the installer will install the software normally, displaying all your customized screens, until it gets to the very end of the installation where the Installer usually disappears and the software runs. At that point, however, the installer will instead UNINSTALL the software. This makes it quick to test your customizations. When you are happy with your work, set test_installer to NO to distribute your software.
The caption displayed at the top left of all the installation screens
The message displayed in the body of the installation screens, above any prompts. Important Note: Use less than 128 characters in each setup_message, and no line breaks or paragraph breaks.
This is the answer that is displayed first on each of the License screens, [license] and [userlicense]. Normally, it says, "I accept the terms of the license agreement."
This is the answer that is displayed second on each of the License screens, [license] and [userlicense]. Normally, it says, "I do not accept the terms of the license agreement."
This section of the documentation has been depreciated. It is included for legacy systems only.
IMPORTANT NOTE: Beginning with version 11.10.00, the Client Customization Tool has been moved onto the Partner's Portal. No further updates will be made to the stand-alone customization and branding tool that was included with pre-11.10 versions. The stand-alone tool has been discontinued and will no longer be supported.
To customize and brand your client installers, log into the Partner's Portal at http://portal.remote-backup.com
The rbackup.reg file contains registry keys that can be added or modified automatically during installation of the Client software. It can contain any value for any registry key. This file can make changes to settings vital to the proper operation of Windows. We recommend editing this file ONLY if you have experience working with .REG files and the Windows Registry.
The rbackup.reg file can contain many values, and can ship from RBS with many varieties of default values. Other sections of this documentation contain references to changing values within this file, and you may be instructed by RBS Technicians to add or edit some of the values within it.
In this section of the documentation we will deal only with those values involved in customizing the Client installer.
Important Notes:
Do not change text inside square brackets [].
Do not change text to the LEFT of the "equal" sign =.
ALL text to the right of the "equal" sign is enclosed in double quotes.
Change ONLY the text inside the double quotes.
Edit this file ONLY with Windows Notepad.
This is a copy of one of the default rbackup.reg files that might be shipped with the software. (some packages may have different features) After you have made changes, save rbackup.reg into the root directory of your Client setup file set.
REGEDIT4
[HKEY_LOCAL_MACHINE\SOFTWARE\Quantum Tech, Inc.\Remote Backup\Settings]
"DUN_URL"=""
"FW"="0"
"FWHost"=""
"FWLogin"=""
"FWPass"=""
"FWPort"="0"
"InstallService"="ASK"
"PauseMode"="False"
"pfmenu"="False"
"pfonly"="False"
"AutoUpdate"="False"
[HKEY_LOCAL_MACHINE\SOFTWARE\Quantum Tech, Inc.\Versions]
"UpdateInfo"=""
Legal values are YES, NO, and ASK and must be all upper case. Enter YES to install the Client software as a Service without asking. Enter NO to install the Client software as an Application without asking. Enter ASK to have the installer ask the user if he wants to install it. See default.lng below to change the text of the ASK prompt. Note: This value is ignored for Windows 98 and earlier, which do not support Windows Services..This value is ignored on Windows Vista, where the Client software is always installed as a Service.
This value controls the display of the Pause button on the file transfer progress screen. "True" turns the Pause button on, and "False" turns it off. The default is False. Legal values are "True" and "False" and MUST be entered in mixed case, exactly as documented here.
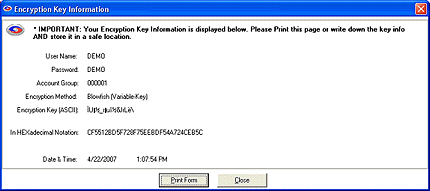
This value controls the availability of the "Print Disaster Recovery Info" menu choice under the Help menu. For security reasons, we recommend you leave this in its default state, which is "False." Enabling this feature with "True" displays the Print Disaster Recovery screen, which will allow anyone with access to RBackup to print the encryption key and all other information that can be used to restore files from the RBS Server through another workstation. Legal values are "True" and "False" and MUST be entered in mixed case, exactly as documented here.
This value controls the prompt which displays "Your encryption key or other settings have been changed. Would you like to create an updated emergency Key File?" whenever the user changes something in the Client software that should alter the key file. This includes (most commonly) changing the encryption key. We strongly suggest you leave this in its default state, which is "False," which will display the prompt and the Print Disaster Recovery Info form. Setting this value to "True" will disable the prompt, and leave the Print Disaster Recovery Info form enabled (which can be disabled independently using pfmenu). Legal values are "True" and "False" and MUST be entered in mixed case, exactly as documented here.
This controls the Client's Auto Update feature which uses the RBSUpdate Utility. If set to "True" the Client software will automatically check for a software update every time it is run. If set to "False" it will not. If an update is found, RBSUpdate will download and install the update silently.
The URL of the RBSUpdate update.txt file. This should be a fully qualified HTTP link for the update.txt file on a web server. Example: http://yourwebsite.com/updates/update.txtFor more information on RBSUpdate, and the AutoUpdate and UpdateInfo values, see The RBS Update Utility.
This section of the documentation has been depreciated. It is included for legacy systems only.
IMPORTANT NOTE: Beginning with version 11.10.00, the Client Customization Tool has been moved onto the Partner's Portal. No further updates will be made to the stand-alone customization and branding tool that was included with pre-11.10 versions. The stand-alone tool has been discontinued and will no longer be supported.
To customize and brand your client installers, log into the Partner's Portal at http://portal.remote-backup.com
The default.lng file contains text substitutions used throughout the Client Installation experience. You can modify the various prompts and message boxes that might appear during the installation. The default text of the values in the default.lng file explain their use.
Important Notes:
Do not change text inside square brackets [].
Do not change text to the LEFT of the "equal" sign =.
ALL text to the right of the "equal" sign is enclosed in double quotes.
Change ONLY the text inside the double quotes.
Edit this file ONLY with Windows Notepad.
This is a copy of the default.lng file that is shipped with the software. (some packages may have different features) After you have made changes, save default.lng into the root directory of your Client setup file set.
[translation]
RENAMEFILE_FAILED = "RenameFile (backup.bak) failed."
UNABLE_TO_LAUNCH = "Unable to launch"
FAILED_TO_SELF_REGISTER = "File(s) failed to self-register: \n"
RENAME_FAILED = "RenameFile (backup.mdb) failed. Contact Tech Support"
SUPPLEMENTAL_SERVICE_AGREEMENT = "Supplemental Service and License Agreement"
INSTALLING_PLUGINS = "Installing PlugIns"
LOADING_PLUGINS = "Loading Plugins..."
UNABLE_TO_CREATE_LIST = "Unable to create list."
UNABLE_TO_BUILD_COMPLETE_FILE_LIST = "Unable to build complete file list."
REMOVING_THIS_SOFTWARE1 = "Removing this software will delete all passwords and encryption keys for your backup files. You will not be able to restore data previously backed up. "
REMOVING_THIS_SOFTWARE2 = "Do you want to completely remove this software?"
ASK_INSTALL_OFA = "This software can back up locked files. This feature requires a reboot after the installation completes. Do you want to install Locked Files support? (Recommended: YES)"
ASK_INSTALL_SERVICE = "Install as a Windows Service?"
SERVICE_LABEL = "Backs up critical data files to a remote server."
BACKING_UP_CATALOG_FILE = "Backing Up Catalog File"
COPYING_DOCUMENTATION = "Copying Documentation"
COPYING_REGISTRATION_FILES = "Copying Registration Files"
COPYING_SECURITY_FILES = "Copying Security Files"
COPYING_CUSTOMIZATION_FILES = "Copying Customization Files"
COPYING_LOCALIZATION_FILES = "Copying Localization Files"
CANNOT_GET_DESKTOP_REGISTRY_KEY = "Cannot get Desktop Registry Key"
OFA_IS_INCOMPATIBLE_WITH = "The Open Files Agent is incompatible with"
AND_WILL_NOT_BE_INSTALLED = "and will not be installed."
Note: The ASK_INSTALL_OFA text substitution is ignored in Windows Vista, where the Client is always installed as a Service.
This section of the documentation has been depreciated. It is included for legacy systems only.
IMPORTANT NOTE: Beginning with version 11.10.00, the Client Customization Tool has been moved onto the Partner's Portal. No further updates will be made to the stand-alone customization and branding tool that was included with pre-11.10 versions. The stand-alone tool has been discontinued and will no longer be supported.
To customize and brand your client installers, log into the Partner's Portal at http://portal.remote-backup.com
The setup.ini file contains values used by the Installer before it has a chance to load values and text substitutions from any of the other files. Modify this file to control the appearance of the very first screen of the Installer, and change some Silent Mode features.
Important Note: The words "Installshield Wizard" cannot be removed from installation screens.
Important Notes:
Do not change text inside square brackets [].
Do not change text to the LEFT of the "equal" sign =.
Edit this file ONLY with Windows Notepad.
No text to the right of the "equal" sign is in quotes
Do not change any values other than those describedhere.
This is a copy of the setup.ini file that is shipped with the software. (some packages may have different features) After you have made changes, save setup.ini into the root directory of your Client setup file set - the same location as the setup.exe file.
[Startup]
AppName=Setup
ProductGUID=F0674B40-D8C3-11D3-8C61-00104B1F6CF0
CompanyURL=http://www..com
ErrorReportURL=http://www.installshield.com/isetup/ProErrorCentral.asp?ErrorCode=%d : 0x%x&ErrorInfo=%s
MediaFormat=1
LogMode=1
Skin=setup.isn
Resource=_Setup.dll
SmallProgress=N
SplashTime=5
CheckMD5=Y
CmdLine=
ShowPasswordDialog=N
EngineVersion=12.0.0.58849
EngineBinding=1
[Languages]
Default=0x0009
count=1
key0=0x0009
the name of your application - normally the same as product_name in clsetup.ini. DO NOT enclose in quotes.
Set this value to Y to use a small initialization dialog instead of the normal larger one.
CmdLine - the command line to use when running Setup.exe, from the following list. The forward slash (/) is a part of the command, and must be specified:
/s : Silent mode - install the RBS Client software silently, without displaying all the normal InstallShield dialogs. See "Running the Client Installation in Silent Mode" in the chapter on Advanced Customization.
/f1 : Specify alternative response file name and path - the /f1 option enables you to specify where the response file is and what its name is, as in Setup.exe /s /f1"C:\Temp\Setup.iss". Specify an absolute path; using a relative path gives unpredictable results. See "Running the Client Installation in Silent Mode" in the chapter on Advanced Customization.
/hide_progress : Suppress Initialization dialog - Suppresses the display of the initialization dialog.
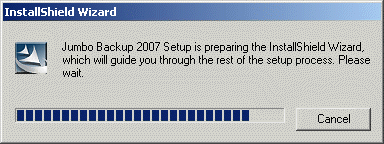
Figure 1 - Initialization Dialog (small)
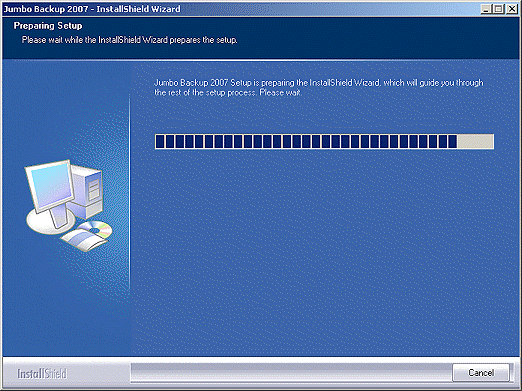
Figure 2- Initialization Dialog(large)